Sunday, September 28, 2008

Posh Mini-Cupcakes :)


In this other side of the world where I live, tea parties or even 'tea time' are uncommon. The European concept/style of tea are mostly practiced by the Manila's chi-chi society in the comfort of hotel lobbies.

Anyway, I recently made a huge batch of mini-cupcakes for a baptismal reception. I thought the proposed design was very "posh" for a baptismal event that the cupcakes I made was fit more to an afternoon tea kind of an affair.

Featured:
The Vanilla Bean's Signature Ultra Moist Chocolate mini-cupcake frosted with Vanilla Buttercream Swirl and finished with gumpaste flower

Pink and browns are amazingly pretty together. Don't you agree? :)

Thursday, September 25, 2008

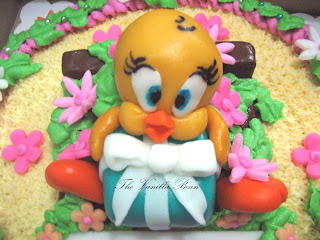
Tweety Bird Birthday Cake


Got a really nice surprise text message from a friend or my friend. My friend Le-Ann referred me to her friend Chester who happens to be looking for somebody to make a birthday cake for his girlfriend.

These things really means a lot to me for firstly, what the heck?!Chester could've gone to Art Cakes, Aggy's Cake Shop or even my friendly Multiply competitors to have his cake done. Right? Next, I always get girl / lady clients ordering cakes or cupcakes for their boyfriends. But this one is a guy, making an effort to surprise his girlfriend. I definitely wanted to make it really special and catered to his every request.

*Chester's Request*
His budget: Php 1,300
- Strawberry Cake
- 3D Tweety design (must be edible)
- Add some Snickers candy bars (it's the GF's favorite)
- Greeting "Happy Birthday Muding!"


So far so good... I definitely tried to stretch his budget to make it cute and pretty.

*My Rendition*
Strawberry cake with Lime Buttercream filling, Vanilla buttercream frosted, Tweety Bird made from gumpaste and sitting on Snickers candy bars, birthday greeting, lots of gumpaste flowers and dragees.


I really don't do meet-ups anymore as I charge for delivery. But this, I made an exception and woke up 5:00 a.m. just to meet Chester near our school by 7:00 to hand him over his surprise to Muding.

Goodness! I definitely feel like a saint! :)

Tuesday, September 23, 2008

Project Alice in Wonderland - (Sneak Peek)

Something truly magical happens when you host a tea and cupcake party and invite a Silly White Rabbit, 2 misunderstood stuff toys and your most loyal friends to document and set the whole thing. I am talking about having a photoshoot a'la Alice in Wonderland about my shop, The Vanilla Bean.This is actually just a project of my bestfriend, Diana for her class wherein they are a pretend Graphic Design company. But knowing my circle of friends, everyone pitched in. It became a "barkada project" again!

I like to extend my warm thank yous to, first of all, Diana and her groupmates Eylin and Czara, for choosing my business as their guinea pig. (Although the shop wouldn't benefit the lovely ad that they did, I always all for great pictures!) Next, to E.R., our in-house photographer. The shots are stunning as always! Monch, for being the art director and Ron for being the all too willing runner and lending his extra flash. Warmest thank you also for Geoff and his mom for sponsoring (spur of the moment decision actually) their home as the venue of our shoot. (We actually were suppose to visit Geoff at his home to see how he is doing after being discharged at the hospital for dengue.) Lastly, to our "youngest", Jaypee, for taking time to visit the shoot despite of his busy schedule.

Can't wait to see the final edited photos! :)

Wednesday, September 17, 2008

Martha Stewart Weddings Philippines Magazine Launch

Whew! I just said a mouthful!

Give joyous praise to the people who brought the number one Wedding Magazine in the United States here to the Philippine shores. Finally, Manila's wedding gurus have a home in the glossy spread of Martha Stewart Weddings.


My sleep went away when I read the sms invite message of my college pastry professor and cake extraordinaire Chef Peachy Juban. The day finally came for the first ever international copy of Martha Stewart Weddings Magazine to be launched at the Conservatory of The Manila Peninsula. She told me about this weeks ago. She's very excited because her wedding cake will be featured in the maiden issue. I was doubly excited for her!

My mentor, Chef Peachy Juban

The event started 3:30 in the afternoon today. Decked out in my elegant afternoon attire (which was specifically noted in the invite of Chef Peachy), I gingerly walked up the stairs and strained my eyes for Chef. Well, having a mole's eyesight, I wasn't surprised Chef Peachy saw me first. At the Conservatory Lobby, she was with her gang... Chef Pam, Chef Kristine and Joanne. We exchange warm hello's and how are you's as Chef Peach started clicking away! A dessert buffet table was set-up nicely. I shuddered to think how many more of those sweets will be inside. True enough, what was inside the Conservatory is even more amazing! In front and center is the mother of all dessert buffet. Different cakes, cupakes, macarons, pastries etc. made by the who's-who of the Philippine Pastry industry (Sonja for Cupcakes by Sonja, Baba Izabeta for Classic Confections, Peachy Juban for Shortcrust, Heny Sison, Mallorca etc.) was carefully and tastefully arranged and laid out in all its glory. Margarita Fores did an outstanding job in the decors. Everything from the decor, covers, down to the desserts are all "Martha Stewart-ish". Pink and brown was the main standout color making it look like a dainty tea party affair. I had to take my camera out as well and start taking pictures before its all gone.

The Cover Cake of MSW Maiden Issue by Baba Izabeta.

Cake flower pots by Peachy Juban

Spectacular dessert buffet!

Cupcake Tree

As I anticipated, there were a lot of media present and a lot of... well... ladies. The team of Style Bible was there to take pictures of the fashionables. I was flattered that they asked my picture and what I wore! (I am very worried of my picture... mind you.)

Anyway, most of the people there know each other. Some of them are classmates from their alma maters. Chef Peachy was kind enough to tell me and introduce me to some of the people whom she just talked to. The industry's stars were there... Heny Sison, Sonja, Pinky Yee, Penk Ching, Jacqui Laudico etc.

Everyone flocked to the buffet table, having a small bit of each to taste. An buzz of excitement and swoons filled the air as each tasted the pretty patries they had on their plate. After awhile, Editor-in-Chief of MSW magazine, Ms. Tata Mapa, took the floor and opened officially the event. She introduced the MSW Philippines magazine as the first ever international franchise of the MSW of the United States. She thanked everyone who came, her staff and the pastry chefs who sponsored the lovely pastries we had that afternoon. A video made by JC Magbanua was also shown and *gasp* surprise! surprise!.. a personal video from the woman behind the brand itself, Martha Stewart.

One of the many dessert plates that I got

The event was totally successful! A lot really came to the point that there weren't enough seats for the late comers. Everyone went home happy with their mini-cake giveaway from Goldilocks, copy of the MSW maiden issue and stomachful of sugary sweets and champagne!

giveaways!
(Cake Flower Pot by Peachy Juban, Goldilocks Mini-Cake & Goldilocks Mini-Polvoron Cake)

Tea parties now are definitely on my "I Love... List"

Monday, September 15, 2008

Off to Singapore!

My graduation is just around the corner and even before realizing this, a dark cloud loomed over me with regards to what I want to do after college. It is such a dilemma I tell you for a fairly indecisive and ambitious girl like me. Even before my last semester started, my parents asked me what are my plans. I was dumbfounded, almost staggering to answer their question. I really could just (and I want and love to beyond words) continue The Vanilla Bean, making it grow and start my own shop but I felt that I was never quite ready for it. I was afraid that I needed more credentials.. more experience to create super dazzling masterpieces and operate it fantastic like how I dreamed it to be. I know I am such a Pastry Girl by heart but I want to test myself in the realms of the "non-pastry" kitchens.

Anyway, my career plan formed during my internship at The Peninsula Manila. During this 3 month stint, I have mingled with people of different races and different walks of life. Of all the stories that I heard, I fell head over heels over the life of the expat chefs. How great it is to see the world by working in the kitchen of another country? Aside from being well compensated, the perks of making new friends of different cultures, learning another language, experiencing another cuisine and learning with the best of the locals astounds me.

This working while traveling really appealed to me for it is a great life for the independent and young! I believe that in this industry, if you want to emerge as the best, you have to build your foundation. Climbing the ladder is the way to go! Having to work for somebody, the training will always be varied and rising up the ranks will be a breeze. Of course learning should be imperative in this industry (for you are such a egomaniac if you find yourself not learning anything at all) but maybe by 25, I have the calibre, gut, skills and experience of a great cuisinaire who can lead a kitchen. I am definitely not in a hurry of making loads of money by running a successful restaurant business. I will come to that. I am an entreprenuer and a businesswoman (I believe..) in nature. Feeding my personal thirst for experience and skills is my priority right now. It is a challenge that I want to commit myself. What I want, when the day comes of opening my own restaurant, what I become, experienced, learn and develop is served hot on the plate. When I'm already tired of being an employee... I'll come back here and start the next part of my career plan.

Anyway... after my internship at The Peninsula Manila, I didn't waste any time. I scoured over the internet for a good job abroad. Lucky stars must've befall on me for just after a month of sending out resumes, checking my email and waiting for something... anything for that mater, I secured a job in Singapore! I'll start as the lowliest rat in the pack... a cook in a restauant at East Coast Park Nevertheless, its all about building the foundation and climbing the ladder right?! It'll be a little star under my belt. And so I am one of the lucky few who while waiting for the "d-day" scored a job. Graduation is just less than a month away and I'll be leaving for my new life the day after. Isn't that exciting?!

But bittersweet it is for along with new beginnings, some things have to end or put on hold. The Vanilla Bean became so much a part of me but I had to post a *CLOSING NOTICE* already. But I will definitely continue it when I come back. (A cakeshop and a fine dining resto I think would be uber nice!) I'll just think of it as me going on a long "recipe development period" in a kitchen somewhere. I will still definitely bake if I get the chance and I will still post my adventures here.

Much to do, much to pack and much to hope for!!!! The Dessert Diary will now extend its pages to my soon to be colorful adventures in Singapore!

Can't wait!

Sunday, September 14, 2008

Tatiana's 1st Princesses Birthday Party

In my, errr, limited years of experience, I usually find the coming of the "-ber"ending months the busiest. The coming of September not only means for me booking bazaars and ordering packaging boxes and walnuts for Christmas (they become quite expensive as the holidays draw near) but also bracing myself for the influx of birthday cakes and cupcakes orders. Every week there is always something to do and someone who books!


Don't get me wrong... I'm not complaining. I'm happiest when I am busy as a bee! Anyway, this post features my first full blast "Stef S." party for the month. (Well, I'm posting it because I love the party theme! ha!) Tatiana, the 1 year old birthday celebrant had a Disney Princesses Theme. Her mommy ordered the Princess Doll Cake with 60 pieces flower cupcakes, 50 Chocolate apples for her giveaways and Chocolate fountain with fruits, biscuits and mallows as dips (Choco fountain pic not included).

The Princess Cake, cupcakes and Chocolate Apples

I was excited when I booked this project. The original plan for the Princess Doll cake was to buy a barbie doll and 'murder' her by cutting her in half! Thank goodness for my habit of checking out baking supply stores. I decided to pass by Cooks Exchange in Glorietta 4 and "voila!" a conveniently naked and half Barbie with a plastic stick as legs! Saves me the trouble of commiting a "crime".


I'd like to thank Mr. Wilton for coming up with the "Color Mist Spray". It's used to tint your icings by spraying... kinda like the Pylox for cupcake icings. Anyway, this little baby gave an a amazing two tone color on to my icing. I tinted first the buttercream with purple as base and spritz a little of the Color Mist Spray for a little definition. PRETTY!


See the subtle gorgeous hint of blue???


The chocolate apples or "crazy apples" as what I call them, are the easiest but messiest to do! Simply melt the chocolate ( I use premium chocolate for my apples), bring it to the right temperature for dipping, dip and shake it a bit and go crazy with the sprinkles and candies! ( My little sister choose to help me only during the sprinkles part.)
White Chocolate

Milk Chocolate

The kids definitely had fun chewing them down in a few minutes nevertheless i had fun, fun fun! making them What a great way to start the "-bers"! Cheers!


Friday, August 29, 2008

Stef's Choco Chunk and Orange Cookie

I'm a big chocolate lover so to me it makes sense to naturally be a big choco chip cookie fan. Big, fat dough with chunks of chocolate surprises makes me a happy girl.

Before I learned how to bake them, I've been munching on Chips Ahoy, Famous Amos and Mrs. Fields. I like those 3 types of cookies but somehow it lacks certain "cookie qualities" that would send me head over heels in love. I take my cookies seriously that is why commercialized cookies are not my thing. Imagine how happy I was when I baked my first batch of cookies. They weren't that pretty for I didn't know know yet the bru-ha-has of making a perfect cookie but to me they were delicious.

Anyway the recipe of my first ever attempt to bake choco chip cookies I found at the back of the Nestle Tollhouse semi-sweet morsels bag. I was thinking "This is a 'safe' recipe.. No screw ups here." WRONG!!!! I somehow managed to screw up the tried and tested Nestle recipe that every homebaker must've made.

And so... in honor my first ever failed choco chip cookies, I decided to bake my "gourmet-ed" up version of the Original Nestle Toll House Choco Chip Cookies.

Here's the Original Nestle Toll House Choco Chip Cookies Recipe

2 1/4 cups APF (All purpose flour)
1 tsp baking soda
1 tsp salt
1 cup (2 sticks) butter or margarine, softened
3/4 cup granulated sugar
3/4 cup packed brown sugar
1 tsp vanilla extract
2 pcs large eggs
2 cups / 12 ounces NESTLE TOLLHOUSE Semi-sweet chocolate morsels
1 cup chopped nuts

PREHEAT oven to 375 degrees F

1. Combine flour, baking soda and salt in small bowl.
2. Beat butter, granulated sugar, brown sugar and vanilla in large mixing bowl until creamy.
3. Add eggs one at a time, beating well after each addition.
4. Gradually beat in flour mixture.
5. Stir in morsels and nuts.
6. Drop by rounded tablespoon onto ungreased baking sheets.

BAKE for 9 to 11 minutes or until golden brown. Cool on baking sheets for 2 minutes; remove to wire racks to cool completely.

Makes about 5 dozen cookies

***
Here's my "gourmet-ed up" version of the Nestle Tollhouse Choco Chip Cookie Recipe

Stef's Choco Chunk and Orange Cookie Recipe

2 1/4 cups APF (All purpose flour)
1 tsp baking soda
1 tsp salt
1 cup (2 sticks) butter, softened (I like using butter over margarine)
3/4 cup granulated sugar
3/4 cup packed brown sugar
1 tsp vanilla extract
1 tsp orange zest
2 pcs large eggs
350 g Callebaut Milk Chocolate or any other fine quality chocolate, chopped into big chunks (explains the name above)
1 cup chopped walnuts

1. Combine flour, baking soda and salt in small bowl.
2. Beat butter, granulated sugar, brown sugar and vanilla in large mixing bowl until just about incorporated.
3. Add eggs one at a time, beating well after each addition.
4. Gradually beat in flour mixture.
5. Stir in zest, chunks and nuts.
let's use walnuts!

chunky chocolate... this is the way I like it!

the zest, chunks and nuts

6. This is only where you PREHEAT oven to 375 degrees F. Let the cookie dough rest in the chiller for awhile. (This is important. It helps infusing the orange flavor more and the butter to harden a bit so that your cookie won't spread so much on the pan)
7. When oven is ready, drop by rounded tablespoon of the cookie dough onto ungreased baking sheets.

BAKE for 9 to 11 minutes or until golden brown. Cool on baking sheets for 2 minutes; remove to wire racks to cool completely. (I personally can't follow this rule... I end up eating the cookie warm!)

Makes about 5 dozen cookies

***

The Verdict:
The Cakey Cookie

It really was a no surprise that it would end up a "cakey" cookie. It was "cakey" in the center and quite crispy around the side. I think the crispiness was caused by the granulated sugar. If it was all brown sugar and was creamed with the butter a bit more, it will be chewy. But nevertheless, it is very yummy! The chunks barely melted are such a delight! The orange zest gave the cookie a little bit of a depth. To me, nothing beats the beautiful combination of chocolate and orange.

A little warning though.. the cookie is quite sweet because of the milk chocolate chunks. I think dark chocolate will go nicely with this. The walnuts added a nice bite to it and an earthy flavor to it but I honestly think you can do without it.

Over-all it was an 'okay' cookie for me... I love the flavor that's why I'll try it in another cookie recipe that I have so that I can see what texture I like more.

Now let me say sayonara for now as I pick crumbs off my plate. :)

Thursday, August 28, 2008

Buttercream Cupcakes

Cupcakes with buttercream frosting takes me back to my childhood. It was during my birthdays when I had a Goldilocks bought character cake. Remember the super sweet white fluffy frosting, the gold chocolate coins, lollipops, sugar flowers and porcelain made cartoon characters? How 90’s was that?! Okay okay, so its not exactly a memory of a cupcake and certainly not buttercream icing. The “fluffy white frosting” is actually boiled icing. Nevertheless, it is my humble memory of a frosting. There were no pretty cupcakes back then. It wasn’t just the trend.

Today, cupcakes are everywhere! They come in all sorts of flavors, sizes and colors. My multiply account is flooded with business contacts making and decorating cupcakes as well. How can you possibly compete with those? I’m lucky I found my niche in decorating cupcakes with fondant.


Trish's 17th Birthday Cupcake Tier

But buttercream cupcakes have a different appeal to me. It has a “rustic-pretty” or “vintage-chic” sorta thing charm to it. I love it also because it’s easy to make the frosting, easy to tint, I can go crazy with my piping tips and I could dash colorful sprinkles. Bottomline, I can create pretty cupcakes with less effort!

Here are some photos of my “non-fondant obsessions”and some of my clients…


Paolo, Rovie and Jeremy


I "Heart" Cupcake


Celebration cupcakes

Jason and JL Wedding


Fondant Cupcakes

Did I tell you about how much I love baking and even just looking at cupcakes??? Cupcakes make me happy and I really don’t know why. Maybe because I find it cute, colorful and small. Wedding cakes make me happy too but that is for another post.

Anyway, I collected so much recipes and pictures of it in different colors, design and presentation that it ate a huge chunk of my memory of my notebook. I printed the best recipes out and organized them in clearbooks. Now, finding space for my clearbooks is my problem.

Setting that aside, I wanted to write about cupcakes because of the small business my friend and I had back in college. We were decorating cupcakes using fondant and edible luster dusts for our friends. Soon it became a hit that people we don’t know manage to get our numbers and order from us. It was really fun at first but when school started demanding our attention more, business became stressful. Needless to say, my partner bailed out but I still continued the business. But I sometimes do not accept orders that is too much for me to make. It breaks my heart everytime I do so.

If I’m not baking a batch for an order, I bake because its just my hobby. Here are some of my fondant designed creations…

“Design my Cupcake”

Any design a client wants that is workable on a 3 oz. size cupcake I can do and believe me I had tons of strange requests. I embrace challenges but I love clients who give me the blessing to design their cupcake how I want it as long as it is according to their “theme”.

For more designs, you can check out my other website.. The Vanilla Bean

Next post will be more on cupcakes.. :)

French Truffles Obsession

That’s it! I’m addicted to Trufettes de France. These are little pieces of heaven that comes in a box.

An opened box in hand and lounging like the great Cleopatra on the sofa, I’m off to lala-land as I engage myself in my personal ritual of chocolate solemnity. I give in to the marvelous scent and taste of this chocolate. I bite and let it melt in my mouth … until I swallow an enormous mouthfuls and dreams aplenty. A truffle is all it takes. And to experience this explosion of love in your mouth, there’s a certain way on enjoying it according to what’s written on the side of the box.

“How to taste these delicate truffles: place them at an ambient temperature of 19-20°C one hour in advance and savour them in the height of their aroma and smoothness.”

Yup! One hour in advance. But a girl like me can’t wait that long for any chocolate. :) I admit that I sometimes eat these babies straight out my fridge while being so aware that I am cheating myself out of what is meant to be a “food-gasmic” experience.

Although it is now available in the country, the price is ridiculously expensive. I get mine from Canada where it is sold like half the price here.

Enjoying them as is, is one thing but using it to make a dessert is a whole different experience. Of course the sensual experience in the mouth is quite lost (okay, different) but flavorwise, it retains it’s characteristics big time!

Sooo… how do I love thee? Let me count the ways…

I have melted and made these babies into a sinfully good cupcake, flourless cake, rich bittersweet mousse and cute little chocolate tarts.

My Grand Truffle Cupcake Tree Flourless Chocolate-Kahlua Cake with Chocolate-Kahlua Icing

I have paired it with Kahlua, hazelnuts, coffee, cherry, lavender, mint, orange… it tastes even fantastic! I’m glad to say I never felt I wasted a good chocolate with it.

To conclude, Truffettes de France are not your-average-ordinary confections. Translated as Truffles of France, these rightfully called “food of the gods”.

Original.. My favorite!

How exquisite is that?!

Healthy Oatmeal Cookies with Belgian Chocolate Chips

I recently bought a big can of Quaker Oats for the sole reason that I was getting tired of bread that I’m always having for breakfast. I just pour hot milk over it, cover and top it with fresh fruits.

But now I noticed even though I have been eating it daily for the past 2 weeks, it doesn’t seem to run out. In a mission to use the oats left something other than for breakfast, I began browsing through magazines for a dessert recipe that I could easily make and be ready as my afternoon snack. I spotted the easy and simple Oatmeal Cookies recipe. The recipe turns out to be the The Ultimate Oatmeal Cookie recipe of Betty Crocker.

After reading the recipe, I found it very plain so I opened my pantry and scoured for anything good that I could zest up my cookies. The recipe calls for a cup of raisins (if desired) to be baked with the cookies. But I was never a fan of raisins so I decided to use chocolate chips instead. You can never go wrong with chocolate on cookies. Thank goodness I had some Callebaut Hard Chips left!

Betty Crocker’s recipe calls out also for brown sugar in the recipe but I decided to go with the all natural muscovado sugar instead to make my cookies a bit healthier.

Since I’m living and baking in a country that has terrible humidity, I learned a trick that got rid of my flat and ugly cookies. The trick that I learned is that after mixing the batter, let it rest first inside the refrigerator. I usually clean up a bit and prepare my trays while my batter is resting. This helps the butter solidify a bit and produces a nice texture on the cookie. To also control the spread of the cookie when baking is that after you scoop them on the tray, place back again the rest of the batter inside the refrigerator so that the butter won’t soften even before it hits the oven. I try to indent a little of my thumb on each cookie so that while it is baking; you’ll get a perfect shaped top on the cookie.

My cookies baked perfectly! I loved how the muscovado sugar and the chocolate chips gave the cookie an awesome balance of sweetness. After successfully baking a perfect batch, I christened thee… “Healthy Oatmeal Cookies with Belgian Chocolate Chips”.

Here’s my tweaked Betty Crocker recipe for you to try out. Happy Baking!

Healthy Oatmeal Cookies with Belgian Chocolate Chips
Yield: about 2 dozen cookies

1 ¼ cups packed light muscovado sugar
½ cup butter, softened
½ teaspoon baking soda
½ teaspoon ground cinnamon
1 teaspoon vanilla
¼ teaspoon salt
1 large egg
1 ½ cups of quick cooking oats
1 1/3 cups all purpose flour
1 ¼ cups high quality chocolate such as Callebaut hard chips

Procedure:
Heat oven to 350F. Beat all ingredients except oats, flour, baking soda, salt, cinnamon and chocolate chips using a stand mixer on medium speed for about 30 seconds or until no lumps of butter are visible.

Then, using a spatula, stir just until blended the rest of the ingredients.

oats, flour, baking soda, salt, cinnamon and chocolate chips

Drop dough by rounded tablespoonfuls about 2 inches apart onto ungreased cookie sheet. Bake 9 to 11 minutes or until light brown. Remove immediately from the cookie sheet to the wire rack.

perfect cookies

After cooling and eating a dozen, I packed the rest of the cookies and gave to a friend as a gift :)